By the second week of October, my dining table stops being a dining table. There’s a hot glue gun on it, usually still plugged in because I keep meaning to unplug it and then don’t, and a paper plate with dried paint on it that I should have thrown out days ago, and somewhere under all that there is apparently a table.
Anyway. Most cheap Halloween DIY decor goes wrong in the same place, and it isn’t the budget; it’s the shine. Dollar store plastic comes out of the bag with a bright, even factory gloss, and your eye picks that up from across the room before it even works out what the object is meant to be, so the skull doesn’t read as a skull first; it reads as plastic first. Once you kill the gloss, the same $1.25 skull can sit on a mantel beside things that cost forty times more, and you won’t be able to tell them apart at a glance, which sounds like an exaggeration until you’ve done it once.
Where Cheap Halloween DIY Decor Usually Goes Wrong
The National Retail Federation runs a consumer survey on this every year. Their most recent one found Americans spending about $4.2 billion on decorations, which is a big number on its own, but what stopped me was that more people are buying decorations than costumes. The decoration figure is bigger than the candy figure. Decorating used to be the thing you did around the costume. It isn’t anymore.
The same survey found 79% of shoppers expected prices to be higher because of tariffs, and I think that’s why my feed in September was full of people asking how to do all this for nothing.
Back to the gloss, because it really is the whole problem. Plastic pumpkins, plastic skulls, those hollow candlesticks, the little resin crows- they all come out of the same kind of mold with the same surface, and they’re all lit under the same store lighting, which flattens everything anyway. Put one under a warm lamp at home, and it just looks wrong; it took me a stupidly long time to work out that the wrongness was the sheen, not the shape or the color.
The baking soda thing
Squeeze some cheap black acrylic craft paint onto a paper plate, add roughly a teaspoon of baking soda, and mix it around until it goes gritty, sort of like wet sand. Paint that on, and when it dries you get a chalky, pitted surface with no sheen at all; it also fills in some of the plastic seam lines, which is a bonus I didn’t expect the first time.
Then dry brushing, which is the step people skip and shouldn’t. Get a stiff brush, put a tiny bit of grey or bone white on it, wipe almost all of it off onto a paper towel until you think you’ve wiped off too much, and then drag it lightly across the raised parts. The grit catches it in the high spots and leaves the recesses dark, and that’s the bit that makes a hollow plastic cauldron look like it weighs something.
Wash the plastic in soapy water first. A lot of it has mold-release residue, and paint won’t grip through it; it’ll look fine for a week and then start flaking off in sheets, which I found out the annoying way with a set of candlesticks I’d spent an evening on.
Eleven Things Worth Making
Some of these need paint, and some of them are just things you already own put somewhere different.
- Cheesecloth ghosts. Drape it over anything roughly head-shaped; a balloon works, a bottle works. Stiffen it with glue watered down about half and half, let it dry overnight, then pull the form out from underneath. They hold their shape, and they move when a door opens, which is most of the effect.
- Milk jug luminaries. Empty gallon jugs with faces cut out, and a battery tea light dropped in. Lined up along a walkway after dark, these beat almost anything you’d buy, and they cost nothing because you were throwing the jug out anyway.
- Painted foam pumpkins. Dollar Tree has foam ones around three dollars. Matte black with the baking soda mix, or bone white with grey brushed over it.
- A stack of old books. Thrift store hardcovers, covers painted flat black, spines lettered with a paint pen. Two dollars maybe, and it anchors a whole shelf.
- Branches in a tall vase. Go outside and get some. This one is free, and it looks far better than a free thing has any right to.
- Bottle candlesticks. Paint wine bottles flat black, then drip wax down the sides from a white candle burned over them.
- A frame swap. Print out a creepy vintage portrait, slide it into a frame that’s already on your wall, put the family photo back in November. Nobody has to know you were lazy about it.
- Mason jar lanterns. Tissue paper and glue on the outside, tea light inside. Kids can do these without supervision, mostly.
- A pumpkin pile on the front step. Three different sizes, grouped tight together rather than spaced out evenly, because evenly spaced always looks like a store display.
- Cobwebs, but much less than you think. A little, stretched thin, in corners. The whole bag draped over a shrub reads as a mistake.
- Black cardstock cats and bats taped inside the windows, lit from behind by a lamp you were leaving on anyway. This one costs nothing, and it’s the one my neighbors actually mention.
Outdoor And Indoor Are Not The Same Problem
Anything made of paper or cardboard stays inside or goes in a window, obviously. Anything going on the porch needs a coat of clear sealer over the paint, or the first properly wet night will lift it; also make sure it’s matte sealer, not gloss, because you didn’t spend all that effort getting rid of the shine to spray it back on.
The milk jugs are the exception to all of it. Already waterproof, weigh nothing, and if one blows down the street in a storm, you’ve lost a milk jug.
If you’re carving actual pumpkins, the whole tradition is older and weirder than the American version suggests. It started in Ireland and Scotland with turnips, and the jack-o’-lantern only became a pumpkin once the practice crossed over and people found something that was far less awful to hollow out. I’ve never carved a turnip, and I don’t plan to.
Carved pumpkins last about five to ten days, depending on how warm your house is, so if the 31st is the night you care about, don’t carve on the 20th like I did one year and then spend the last week of October looking at a collapsing face.
What I Wouldn’t Bother With
Inflatables, even the cheap four-foot ones that are around five dollars now, because they need the fan running the whole time, they spend all day as a deflated puddle on the grass, and then you have to go out and turn them on again every evening.
Anything with glitter on it. It gets on your hands and then on everything your hands touch, and you find it in the carpet in February, and glitter reads as cheap the same way gloss does anyway.
The pre-made signs with a pun on them. They’re fine. I don’t think anybody has ever slowed down to look at one.
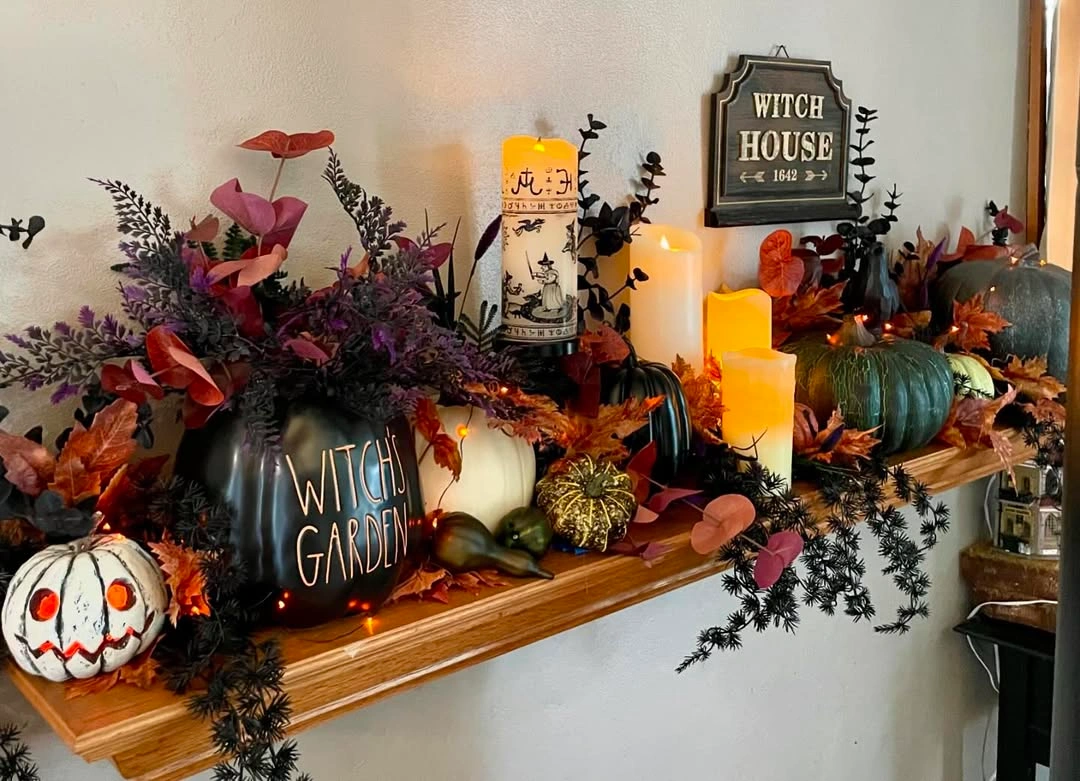
Grouping matters more than any individual piece, and the same rules that make a fall mantel work carry over completely: odd numbers, different heights, one thing noticeably taller than everything around it. It’s not a separate skill for Halloween; it’s the same arrangement you already know in a darker set of colors.
Do You Actually Need To Buy Anything
Not much, honestly.
I went through my own storage bins last October before buying anything at all and came out with three glass bottles, a pair of candlesticks, a mirror, a wooden tray and a stack of books I’d never reread. Painted four of those and left the rest as they were. I think the total spend was under fifteen dollars, and that was paint and tea lights.
Dollar stores are genuinely good for the consumable side of this. Tea lights, cheesecloth, black cardstock, craft paint, glue sticks. They’re much less useful for finished objects, because a finished object from a dollar store carries on looking like one until you’ve put work into it, and by that point you could have started with something you already had in a box in the garage. That’s why thrift store finds beat new decor most of the time: you end up with real glass and real wood rather than a molded copy.
So I’ll say the thing that most budget decorating advice hedges on.
Buying more cheap things is not the budget option. Painting fewer things is. Five objects you’ve actually worked on will beat thirty straight out of the packet, and it costs less to get there. The sprawling display full of store-bought pieces is the one that ends up looking expensive in the bad sense, not the sparse one, and I think people have this backwards, which is how you spend sixty dollars to look like you spent sixty dollars.
If you do only one thing from all of this, mix baking soda into the black paint and find something shiny.